Getting started with AI
Offers a beginner-friendly primer on the OpenAI API, structured outputs, and custom tool use. Recommends Python and shows how to configure environment variables, SDK setup, and best practices for experimentation. Walks through text and multimodal examples that demonstrate core API patterns and how to ground responses in schemas. Aims to equip readers to move beyond the ChatGPT UI and start building their own AI-powered tools.

Introduction
I’m frequently asked if I have any guidance for getting started with AI, so I decided to write a brief post describing a few concepts I think are important to learn. I’ve written about most of these in various posts over the last few months, but putting them all together in a single place will hopefully be more useful to those wanting to learn how to build things with AI.
If you want to build tools and capabilities that go beyond what you can do by opening ChatGPT in your browser, I think familiarity with these three concepts is critical:
- The OpenAI API
- structured output
- custom tool use
Knowledge of the above opens up enormous possibilities for building unique tools. First, I highly recommend you use the Python programming language. OpenAI has official SDKs in other languages, but unless you have a strong preference for a different language, I would stick with Python for a variety of reasons:
- An official Python SDK from OpenAI
- Tons of resources available for learning the language
- A rich ecosystem of packages covering a wide variety of functionality
- Jupyter notebooks make experimentation easy
For these reasons, I’ve chosen to use Python when building the vast majority of my AI-enabled tools and when writing this blog. The rest of this post will go over each concept with Python examples using the official OpenAI Python SDK.
The OpenAI API
The OpenAI API is what allows you to interact with OpenAI’s LLMs programmatically. Nearly everything you can do in ChatGPT can be done via the API. For example:
- Submit text queries and get responses back
- Send images, documents, and audio as part of your queries
- Generate images from text, existing images, or a combination of both
- Generate audio from queries
To get started, you will need an OpenAI account. As OpenAI uses a pay-as-you-go model for API usage, add some funds to your account via the billing settings page. Next you’ll need to generate an API key and make it available to your Python code. One easy way to do this is to store your key in a .env file either in your home directory or in a project directory where your Python code will live. The .env file contents would look like this:
1
OPENAI_API_KEY="your_api_key"
Then, in your Python scripts and Jupyter notebooks, you can load the .env file before you start using the OpenAI API:
1
2
from dotenv import load_dotenv, find_dotenv
load_dotenv(find_dotenv())
This will look for a .env file in the script’s directory, and if one is not found, it will continue searching parent directories until one is located.
Now you can start using the API. Let’s go through two examples: one text-based and another where we send an image to the API.
Text queries
Sending text queries to the OpenAI API requires only two parameters: the model you want to use and the query text.
1
2
3
4
5
6
7
8
9
10
11
12
13
14
15
# ensure you first install required packages in your Python environment:
# pip install openai python-dotenv pydantic
from openai import OpenAI

client = OpenAI()

response = client.responses.create(
    model="gpt-5-mini",
    input=[{
        "role": "user",
        "content": "Provide a brief description of what an API is in programming."
    }]
)

print(response.output_text)
The code above will print out the model’s response, which will be slightly different every time it’s generated:
An API (Application Programming Interface) is a defined set of rules and routines that lets one software component communicate with another. It exposes functions, data structures, or web endpoints so developers can use functionality without needing to know the internal implementation. Examples include library APIs (function calls in code) and web APIs/REST endpoints (HTTP requests returning data). APIs provide abstraction, reuse, and interoperability between programs and services.
A single, one-off query is a bit limited compared to the ChatGPT website, where queries and responses are organized into conversations so that you can ask follow-up questions. There are multiple ways to accomplish the same thing using the API, and the easiest way is to create a Conversation object and refer to it when submitting each query:
1
2
3
4
5
6
7
8
9
10
11
12
13
14
15
16
17
18
conversation = client.conversations.create()
response = client.responses.create(
    model="gpt-5-mini",
    conversation=conversation.id,
    input="List three popular programming languages.",
)

print("First response:")
print(response.output_text)

response = client.responses.create(
    model="gpt-5-mini",
    conversation=conversation.id,
    input="List two more.",
)

print("Second response:")
print(response.output_text)
This produces:
1
2
3
4
5
6
7
First response:
1. Python
2. JavaScript
3. Java
Second response:
4. C++
5. C#
Those are the basics for text queries! We will see that text queries are often the foundation of AI-enabled apps, and when combined with structured output and tool use (explained below), they allow for some cool possibilities!
Queries with images
Most of OpenAI’s models are multimodal, meaning they were trained on not just text but also audio and images. This allows them to accept as input text, audio, and images and produce outputs in all three formats. Let’s see how to submit an image to the API along with a text query. We will use the example photo below and ask the model to guess the location.

This is one approach described in OpenAI’s images and vision API documentation. The input parameter can specify both text and image components:
1
2
3
4
5
6
7
8
9
10
11
12
13
14
15
16
17
18
19
20
21
22
23
24
25
26
27
28
29
30
31
32
import base64
from openai import OpenAI

client = OpenAI()

def encode_image(image_path):
    with open(image_path, "rb") as image_file:
        return base64.b64encode(image_file.read()).decode("utf-8")

image_path = "IMG_2765.jpeg"
base64_image = encode_image(image_path)

response = client.responses.create(
    model="gpt-5-mini",
    input=[
        {
            "role": "user",
            "content": [
                {
                    "type": "input_text",
                    "text": "Where might this image be from?",
                },
                {
                    "type": "input_image",
                    "image_url": f"data:image/jpeg;base64,{base64_image}",
                },
            ],
        }
    ],
)

print(response.output_text)
This outputs:
This looks like the Faroe Islands — specifically the famous Kallur lighthouse on the island of Kalsoy. The narrow grassy ridge, small white/red lighthouse and steep sea cliffs match that spot.
Now that we’ve covered the OpenAI API basics, let’s look at how to get programmatically useful output.
Structured output
Earlier this year I wrote an entire blog post about structured output, but I’ll review it again here as it is an extremely useful concept.
In all of the examples above, what we got back from the OpenAI API was a block of text. This might be sufficient for chat-based applications where you simply want to relay to the user the output of the model, but for other applications we often need to consume the output programmatically. For example, let’s say we have this photo of a Post-it Note:
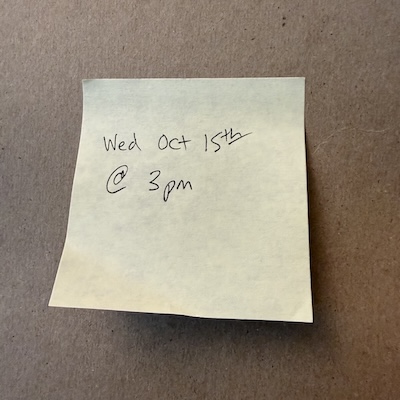
How can we use the OpenAI API to extract the date and time specified in the note? The first step is to define the exact output format that we want. We do this using Pydantic models, which are Python classes with defined attributes - not to be confused with the model parameter in an OpenAI API call! Since we want a date and a time, we’ll use Python’s built-in datetime module to define a model with the two desired attributes:
1
2
3
4
5
6
from datetime import date, time
from pydantic import BaseModel

class Event(BaseModel):
    event_date: date
    event_time: time
Now, we can send a query to the API with the image and specify that we want the result to be of type Event:
1
2
3
4
5
6
7
8
9
10
11
12
13
14
15
16
17
18
19
20
21
22
23
24
25
26
27
28
29
30
31
32
33
34
35
36
37
38
39
40
from datetime import date, time
import base64
from pydantic import BaseModel
from openai import OpenAI

class Event(BaseModel):
    event_date: date
    event_time: time

client = OpenAI()

def encode_image(image_path):
    with open(image_path, "rb") as image_file:
        return base64.b64encode(image_file.read()).decode("utf-8")

image_path = "post-it-note.jpeg"
base64_image = encode_image(image_path)

response = client.responses.parse(
    model="gpt-5-mini",
    input=[
        {
            "role": "user",
            "content": [
                {
                    "type": "input_text",
                    "text": "Return the date and time from this image, assuming the current year."
                },
                {
                    "type": "input_image",
                    "image_url": f"data:image/jpeg;base64,{base64_image}",
                },
            ],
        }
    ],
    text_format=Event,
)

event = response.output_parsed
print(f"Event date: {event.event_date}, Event time: {event.event_time}")
The response object’s output_parsed attribute gave us an instance of our Event model, which we used to retrieve the date and time:
1
Event date: 2025-10-15, Event time: 15:00:00+00:00
Models can have attributes referring to other models, allowing the API to return complex data structures. Let’s use a cooking recipe as an example. We can define separate models for the ingredients and steps, and have the recipe itself be composed of a list of ingredients and steps, along with some additional attributes:
1
2
3
4
5
6
7
8
9
10
11
12
13
14
15
16
17
18
from pydantic import BaseModel

class Ingredient(BaseModel):
    name: str
    quantity: float
    unit: str

class Step(BaseModel):
    step_number: int
    instructions: str

class Recipe(BaseModel):
    title: str
    ingredients: list[Ingredient]
    steps: list[Step]
    prep_time_minutes: int
    cook_time_minutes: int
    servings: int
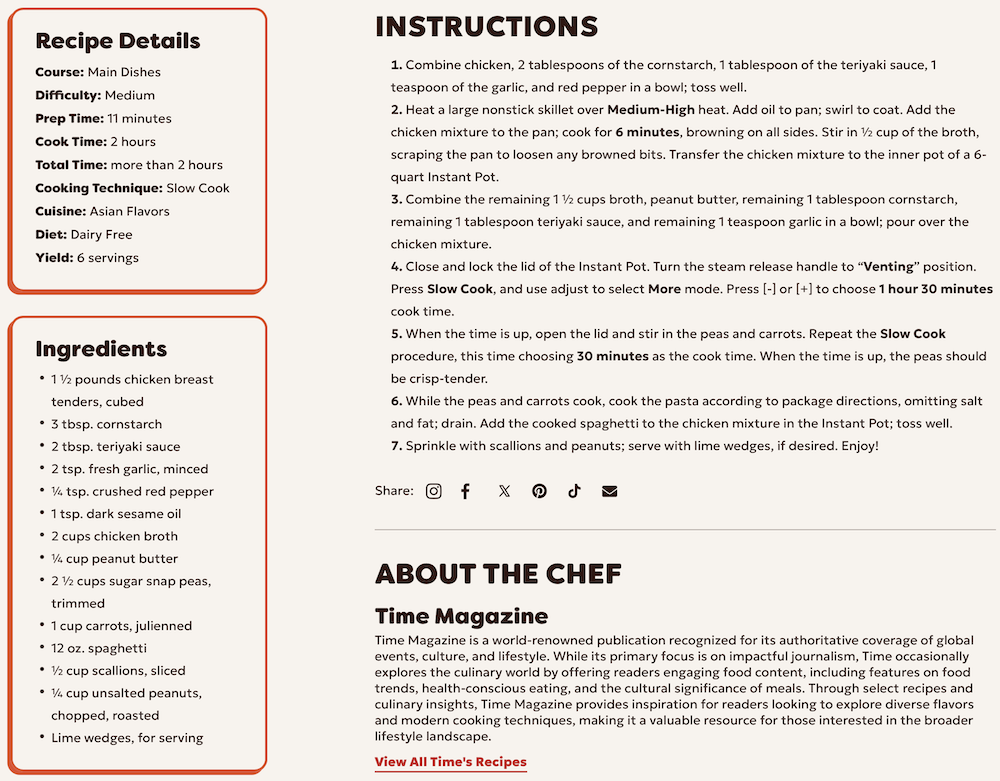
Now we can provide a recipe to the OpenAI API in any format and ask for the response to be a Recipe model. Let’s try it with a screenshot from this Instant Pot peanut chicken recipe page:
1
2
3
4
5
6
7
8
9
10
11
12
13
14
15
16
17
18
19
20
21
22
23
24
25
26
27
28
29
30
31
32
33
34
35
36
37
38
39
40
41
42
43
44
# remember to also include our pydantic model definitions above
import base64
from openai import OpenAI

client = OpenAI()

def encode_image(image_path):
    with open(image_path, "rb") as image_file:
        return base64.b64encode(image_file.read()).decode("utf-8")

image_path = "recipe-screenshot.png"
base64_image = encode_image(image_path)

response = client.responses.parse(
    model="gpt-5-mini",
    input=[
        {
            "role": "user",
            "content": [
                {
                    "type": "input_text",
                    "text": "Return a structured recipe from this image."
                },
                {
                    "type": "input_image",
                    "image_url": f"data:image/jpeg;base64,{base64_image}",
                },
            ],
        }
    ],
    text_format=Recipe,
)

recipe = response.output_parsed
print(f"Recipe title: {recipe.title}")
print(f"Ingredients:")
for ingredient in recipe.ingredients:
    print(f" - {ingredient.name}, quantity: {ingredient.quantity} {ingredient.unit}")
print(f"Steps:")
for step in recipe.steps:
    print(f" {step.step_number}. {step.instructions}")
print(f"Preparation time: {recipe.prep_time_minutes} minutes")
print(f"Cooking time: {recipe.cook_time_minutes} minutes")
print(f"Servings: {recipe.servings}")
As expected, we get back a nicely structured recipe:
1
2
3
4
5
6
7
8
9
10
11
12
13
14
15
16
17
18
19
20
21
22
23
24
25
26
27
Recipe title: Slow-Cooker Peanut Butter Teriyaki Chicken with Spaghetti
Ingredients:
 - chicken breast tenders, cubed, quantity: 1.5 pounds
 - cornstarch, quantity: 3.0 tablespoons
 - teriyaki sauce, quantity: 2.0 tablespoons
 - fresh garlic, minced, quantity: 2.0 teaspoons
 - crushed red pepper, quantity: 0.25 teaspoons
 - dark sesame oil, quantity: 1.0 teaspoon
 - chicken broth, quantity: 2.0 cups
 - peanut butter, quantity: 0.25 cup
 - sugar snap peas, trimmed, quantity: 2.5 cups
 - carrots, julienned, quantity: 1.0 cup
 - spaghetti, quantity: 12.0 ounces
 - scallions, sliced, quantity: 0.5 cup
 - unsalted peanuts, chopped, roasted, quantity: 0.25 cup
 - lime wedges (for serving), quantity: 0.0 wedges
Steps:
 1. Combine chicken, 2 tablespoons of the cornstarch, 1 tablespoon of the teriyaki sauce, 1 teaspoon of the garlic, and red pepper in a bowl; toss well.
 2. Heat a large nonstick skillet over Medium-High heat. Add oil to pan; swirl to coat. Add the chicken mixture to the pan; cook for 6 minutes, browning on all sides. Stir in 1/2 cup of the broth, scraping the pan to loosen any browned bits. Transfer the chicken mixture to the inner pot of a 6-quart Instant Pot.
 3. Combine the remaining 1 1/2 cups broth, peanut butter, remaining 1 tablespoon cornstarch, remaining 1 tablespoon teriyaki sauce, and remaining 1 teaspoon garlic in a bowl; pour over the chicken mixture.
 4. Close and lock the lid of the Instant Pot. Turn the steam release handle to 'Venting' position. Press Slow Cook, and use Adjust to select More mode. Press [-] or [+] to choose 1 hour 30 minutes cook time.
 5. When the time is up, open the lid and stir in the peas and carrots. Repeat the Slow Cook procedure, this time choosing 30 minutes as the cook time. When the time is up, the peas should be crisp-tender.
 6. While the peas and carrots cook, cook the pasta according to package directions, omitting salt and fat; drain. Add the cooked spaghetti to the chicken mixture in the Instant Pot; toss well.
 7. Sprinkle with scallions and peanuts; serve with lime wedges, if desired. Enjoy!
Preparation time: 11 minutes
Cooking time: 120 minutes
Servings: 6
Structured output is important because it allows us to very easily use the output of an OpenAI API call as input to another system - whether that be a database, another API, or our own custom program.
Next, let’s look at providing the AI model access to custom tools that allow it to request information or perform actions that it would not otherwise be capable of.
Tool use
In this context, tools are Python functions that we describe to the LLM as part of a query. If the model decides that it needs to use one of the described tools in order to fulfill the query, it will send back a tool request. We are then responsible for executing the specified tool with the provided parameters and sending the result back through the API so it can continue processing the query using the output of the tool.
Tools either provide information to the model or let it perform specific actions. Let’s walk through an example to see how it works. Let’s say we have a Python function that can be used to search through a private contact database. We can implement it with a list of fake contacts for this example:
1
2
3
4
5
6
7
8
9
10
11
12
13
14
15
16
17
18
19
20
21
22
23
24
25
26
27
28
29
30
import json
from openai import OpenAI

my_contacts = """[
{ "first_name": "Alice", "last_name": "Nguyen", "email_address": "alice.nguyen@example.com", "mobile_number": "+1-202-555-0147" },
{ "first_name": "Brian", "last_name": "Henderson", "email_address": "brian.henderson@example.com", "mobile_number": "+1-303-555-0198" },
{ "first_name": "Carla", "last_name": "Mendez", "email_address": "carla.mendez@example.com", "mobile_number": "+1-415-555-0132" },
{ "first_name": "David", "last_name": "Sharma", "email_address": "david.sharma@example.com", "mobile_number": "+1-646-555-0174" },
{ "first_name": "Elena", "last_name": "Petrov", "email_address": "elena.petrov@example.com", "mobile_number": "+1-718-555-0129" },
{ "first_name": "Felix", "last_name": "Johnson", "email_address": "felix.johnson@example.com", "mobile_number": "+1-210-555-0163" },
{ "first_name": "Grace", "last_name": "Martinez", "email_address": "grace.martinez@example.com", "mobile_number": "+1-512-555-0186" },
{ "first_name": "Hiroshi", "last_name": "Tanaka", "email_address": "hiroshi.tanaka@example.com", "mobile_number": "+1-917-555-0155" },
{ "first_name": "Isabella", "last_name": "Moretti", "email_address": "isabella.moretti@example.com", "mobile_number": "+1-305-555-0118" },
{ "first_name": "Jonas", "last_name": "Keller", "email_address": "jonas.keller@example.com", "mobile_number": "+1-408-555-0192" }
]"""

contacts = json.loads(my_contacts)

def search_contacts(first_name: str | None, last_name: str | None) -> str:
    matches = []
    for contact in contacts:
        if first_name and first_name.lower() not in contact["first_name"].lower():
            continue
        if last_name and last_name.lower() not in contact["last_name"].lower():
            continue
        matches.append(contact)
    results = ""
    for match in matches:
        results += f'{match["first_name"]} {match["last_name"]}, email: {match["email_address"]}, mobile: {match["mobile_number"]}\n'
    return results
Next we need to describe the tool using OpenAI’s function definition syntax:
1
2
3
4
5
6
7
8
9
10
11
12
13
14
15
16
17
18
19
20
tools = [
    {
        "type": "function",
        "name": "search_contacts",
        "description": "Search for contacts by first name and/or last name.",
        "parameters": {
            "type": "object",
            "properties": {
                "first_name": {
                    "type": "string",
                    "description": "The first name of the contact to search for."
                },
                "last_name": {
                    "type": "string",
                    "description": "The last name of the contact to search for."
                }
            },
        },
    },
]
Now we can submit a query that includes the tool definition, which effectively tells the LLM that our search_contacts function is available for it to use.
1
2
3
4
5
6
7
8
9
10
11
client = OpenAI()

inputs = [
    {"role": "user", "content": "Find the contact information for Jonas."}
]

response = client.responses.create(
    model="gpt-5-mini",
    tools=tools,
    input=inputs,
)
Since the user of the API is responsible for performing the actual execution of the tool, we have to check if the response includes a function_call request. We do this by iterating over the items in the response.output. For each tool call request found, we need to execute our function with the parameters provided by the LLM and construct a special function_call_output dictionary to send back as part of a follow-up API call.
1
2
3
4
5
6
7
8
9
10
11
12
13
14
inputs += response.output

function_call_requests = filter(lambda x: x.type == "function_call", response.output)

for req in function_call_requests:
    if req.name == "search_contacts":
        print(f"Calling search_contacts with arguments: {req.arguments}")
        contact_info = search_contacts(**json.loads(req.arguments))

        inputs.append({
            "type": "function_call_output",
            "call_id": req.call_id,
            "output": contact_info
        })
Output:
1
Calling search_contacts with arguments: {"first_name":"Jonas","last_name":""}
Now that we’ve performed the requested tool call and appended the result to our list of inputs to the LLM, we need to send another query to the LLM with our tool’s output (now part of the inputs list) in order to get the final response:
1
2
3
4
5
6
7
response = client.responses.create(
    model="gpt-5-mini",
    instructions="Display only the requested contact information.",
    tools=tools,
    input=inputs,
)
print(response.output_text)
This results in the final output for our query:
1
2
3
Jonas Keller
Email: jonas.keller@example.com
Mobile: +1-408-555-0192
While this is a simple example, it demonstrates how one can provide new capabilities to LLMs using custom tools. Combined with the rich ecosystem of Python packages, there are endless ways of harnessing LLMs to do useful tasks. Here are just a few examples:
- Some home security cameras allow programmatic access to a still image. You could periodically retrieve an image and send it to the LLM for analysis. The results could then be sent via email or SMS.
- Tools like macOS Shortcuts can execute Python scripts in response to events, such as downloading a file. A script could, using the OpenAI API and a custom tool, automatically organize the new files in your Downloads folder based on criteria you specify in a prompt.
- A script could retrieve the day’s weather forecast from a weather provider API, retrieve your calendar appointments for the day using a custom tool, and then notify you if the weather might disrupt your plans.
Other concepts
Once you become familiar with the OpenAI API, structured output, and custom tools, I’d suggest you look at the OpenAI Agents SDK. Agents package these concepts and abstract some details. For example, the Agents SDK automatically handles function calling when requested by the LLM. I used the Agents SDK to implement my genomics rare disease assistant, using custom tools to provide the agents with the resources needed to search a database of genetic variants.
I hope this post proves useful for those wanting to get started building AI-enabled tools and apps. I always recommend that people start by experimenting - oftentimes, you won’t know exactly how well an AI model will perform at specific tasks until you try!